Coffee Alarm
I still love this project. Biggest regret here is that I had to take apart the default way to trigger a coffee and I didn't add in a button to fix that. Still makes great coffee!

I had been drinking coffee for a few months before I watched Wallace and Gromit: Vengeance Most Fowl1 and realized everything in life should be automated. Naturally, I knew exactly where to start: my Nespresso machine.
Prior to this project I had used my Raspberry Pi maybe a decade ago to make a servo spin a couple times. And admittedly I mostly sat there while my friend who knew how to code wrote some Python. I didn't really know anything about electricity or home automation at the start of this and had a lot to learn.
My vision was that the night before I'd insert the Nespresso pod, position the cup, and press a button. Then the next morning I'd wake up to coffee at 7am. Without knowing how exactly I'd do it, I knew there would be three components to this system.
Operation: Starts the Nespresso.
Trigger: Record a button press the night before.
Scheduling: If the Trigger happened, start the Operation at 7am.
Operation
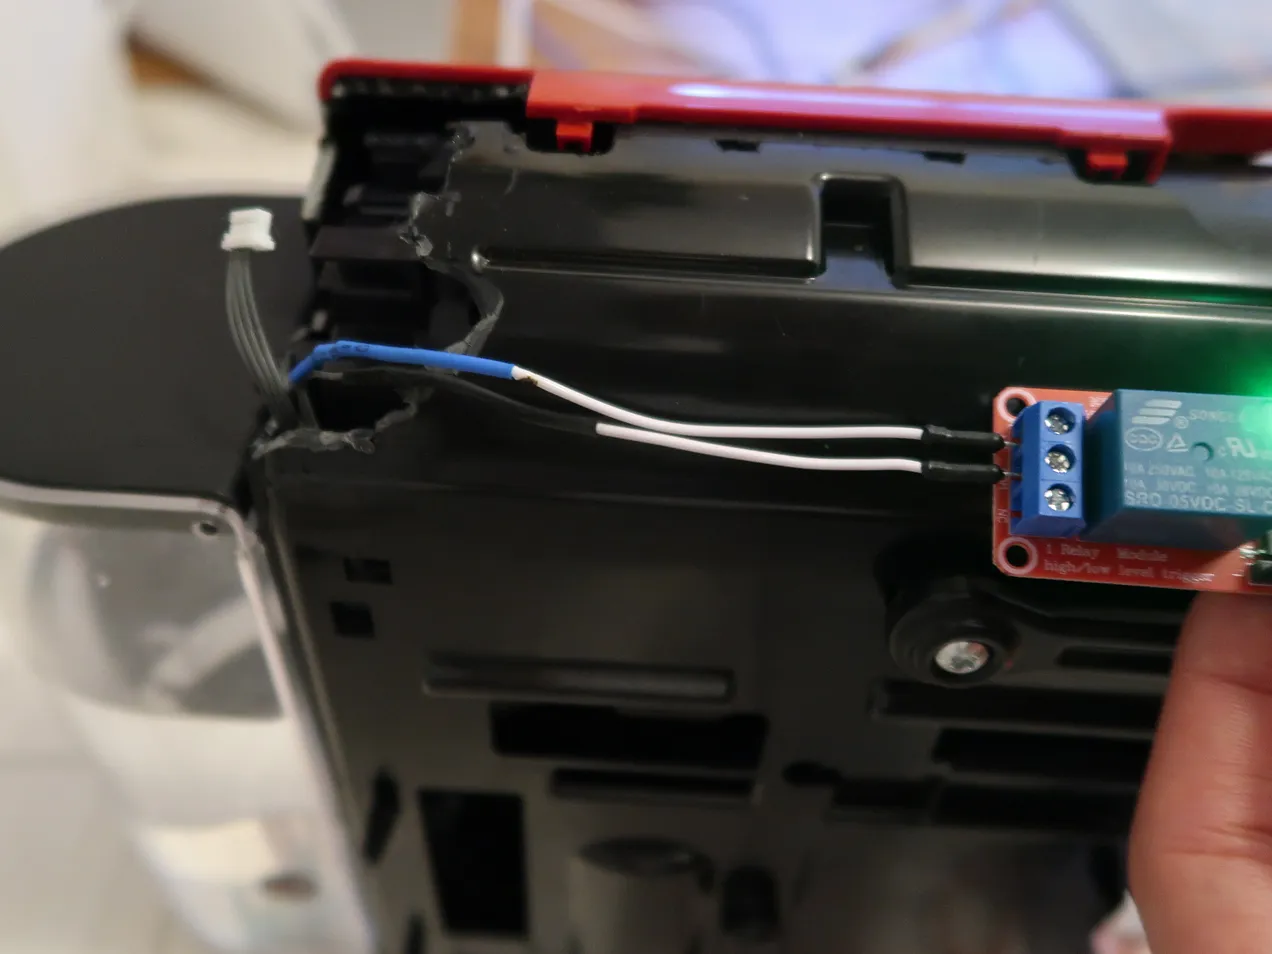
A classic Nespresso2 has two buttons - I’ll call them small and large (though they have fancy Italian names for marketing purposes). To operate it you press either button once to heat up the boiler and then either small or large depending on the coffee size you’d like. Obviously the large size pumps more water through the pod but I am not sure whether the pressure is the same or how the pods marked small and large differ. At this stage in my coffee journey I'll blashpheme and say I don't really care, I just like the small. Whichever button you choose momentarily completes a circuit which starts up the machine. To automate this step I'd need to schedule the completion of this circuit which I did using an ESP32 and a Switch.
ESP32
ESP32s are like a more powerful Arduino or a tiny Raspberry Pi. They don't really have an operating system in a traditional sense. You can program them using Arduino, which lets you write just two functions, setup and loop (which runs continuously while the ESP32 has power). Or, and easier for this purpose, you can program them using a configuration file compiled and flashed onto the ESP32 through ESPHome.3
How electricity works and why it's cool
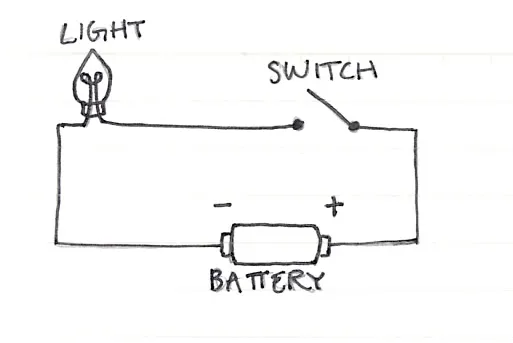
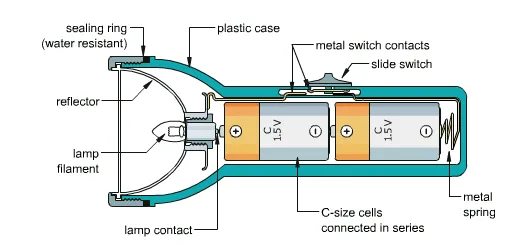
For someone like me who thinks about electricity very little, it's easy to fall under the impression that our appliances suck electricity from an outlet. Before this project, if you asked me what each prong was for on a plug I might have said it was for redundancy. I'm certain I knew the correct answer at some point but for the most part, electricity was one of those magical things that I relied on but didn't really understand, like the internal combustion engine or the reliable deliciousness of an Oreo. And that's okay, life isn't about understanding everything but understanding electricity opens up so many doors to designing our environments4 that I'm happy I've finally taken the plunge. So the prongs aren't for redundancy, they're to complete the electrical circuit so that current will flow through your appliance. I really like the idea of a flashlight5 as a simple explanation for a circuit and switch and I know I'll come back to it.
Switch
Like the switch in the flashlight above, the switch I'm using is a physical switch. My switch works by moving a metal piece to complete a circuit when it receives a signal from my ESP32. I could have used an electrical switch6 like this Smart Nespresso project did but the LED and clicking noise to indicate switching and high maximum load made this one perfect for a novice like myself.
Next I needed to connect the wires from my switch to the Nespresso, which would require soldering. I got the cheapest solder on Amazon, watched some safety videos, burnt myself, wondered why it smelled like plastic, realized I was melting the Nespresso case, found myself completely lacking the vision or dexterity to avoid soldering the rings closed, decided against a one year training montage and hundreds of dollars of equipment to do it right, and took a step back.
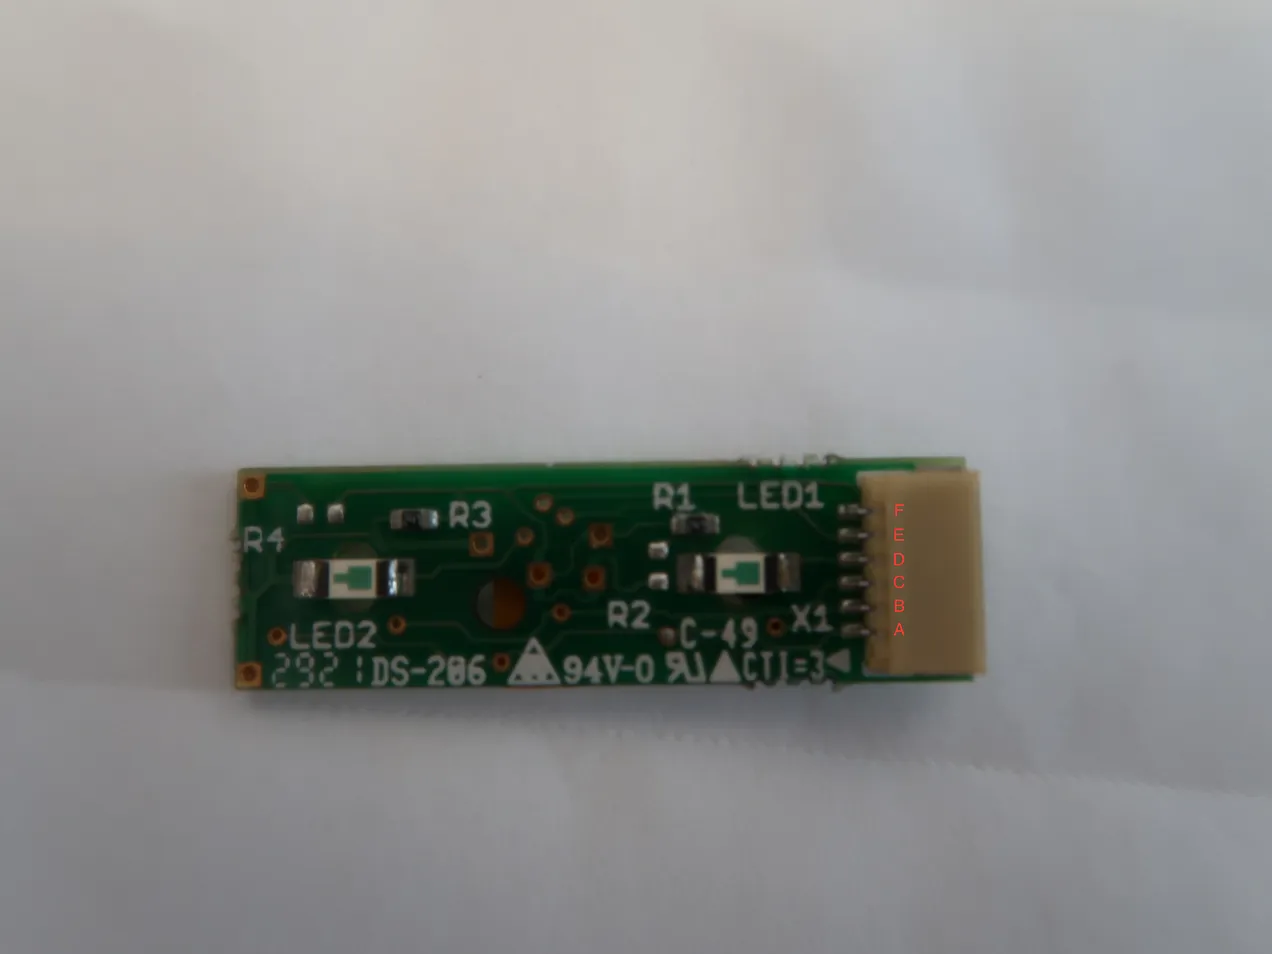
 Instead of soldering the button I decided to remove the button and wire in directly to the wires that the button switch was controlling.7 Surprisingly it was pretty easy to follow the circuit lines on the back of the button to figure out which corresponded to pressing the small button. A and B make a small coffee. A and C make a large coffee. DEF are used to light the LEDs to give the user feedback. When the AB or AC connection is made the first time, both LEDs light up to indicate the machine is warming up. Once its warm, when either the AB or AC is connection is made either a small or large coffee is made and only the LED corresponding to small or large lights up.
Warning: To use a software architecture metaphor, my choice to wire around the button is akin to ripping out an API interface and calling the internal methods directly. This is bad because I’ve nuked some complicated internal logic - when to light up the LEDs and for how long. For now I think I can do without the LEDs but from both a safety and user experience perspective there are very good reasons to want an indication of when the machine is on. My judgement was that the reliability trade offs of a solid wire connection were worth losing these features.
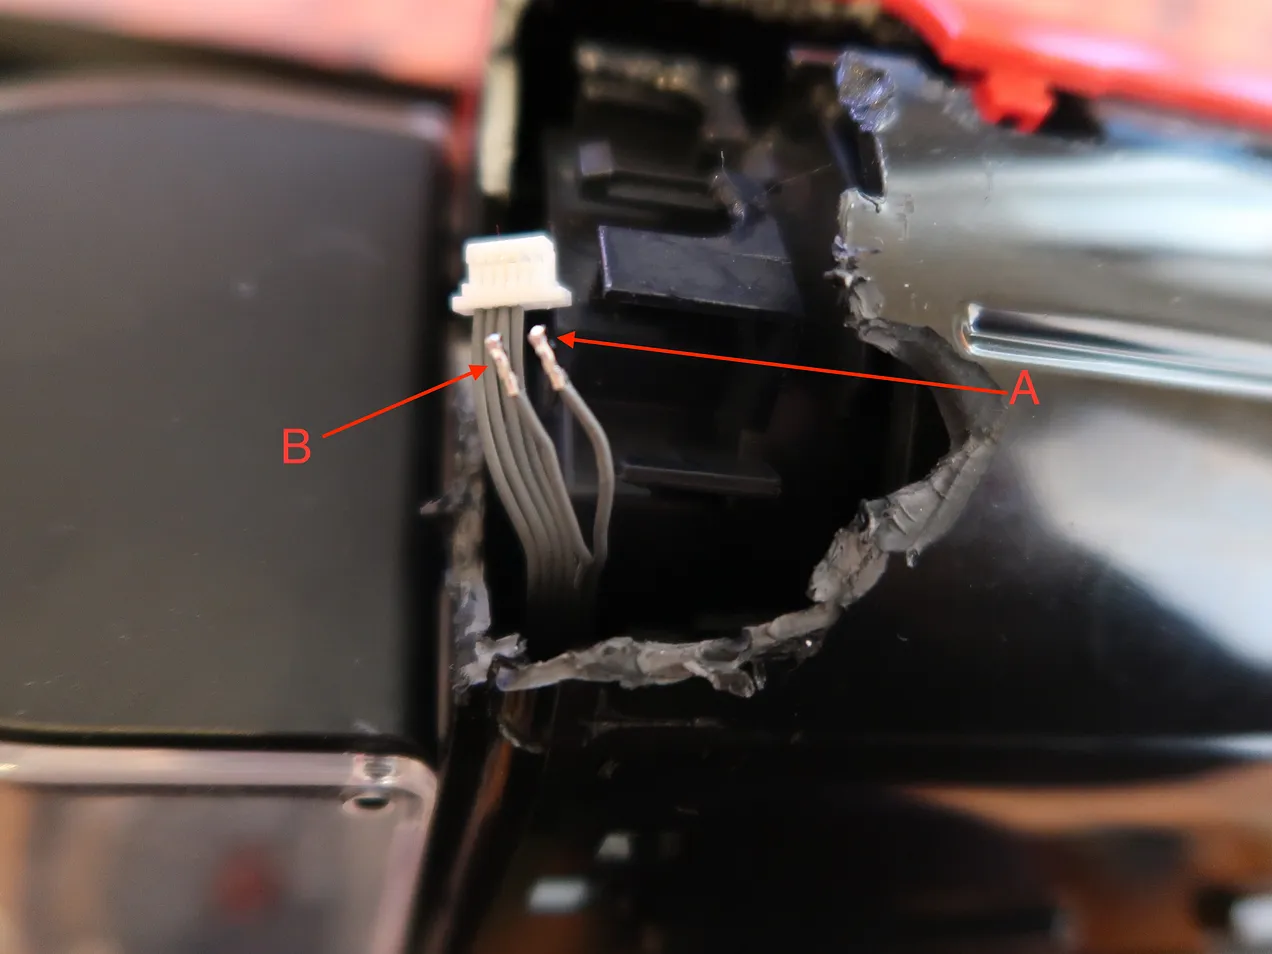
While I could have plugged these wire ends directly into the switch I decided to extend their reach by soldering another wire on. That should give me more flexibility when I decide how to put the final product in a sleek package.
Trigger
An "automatic" coffee machine that runs at 7am every morning isn't a good idea for obvious reasons. Instead of "automatic" I’m going for "delayed". I click a button and tomorrow at 7am I get coffee. If I always went to bed at the same time the button could start a timer. Instead I’ll treat the button press like a preorder and have home assistant start up the coffee maker if there’s been a preorder the night before. Electronically, the button works somewhat reverse of how the switch works. Instead of a signal from my ESP32 completing the circuit, a button press completes a circuit and thereby sends a signal to my ESP32 and on to Home Assistant.
This one was short and sweet. Trigger Complete.
Orchestration
Home Assistant is an open source home automation system that runs best as an operating system. I flashed an SD card with the OS using Pi Imager, plugged my Raspberry Pi 3 into an Ethernet cable, and navigated to the local network URL for Home Assistant from my mac.8
I found home assistant configurations to be the most difficult part of this project because it was the only black box part of the system. The electronics were new to me but it was plainly obvious how each component interacted. As I grew more comfortable with Home Assistant I skipped the GUI and made changes directly to the configuration files. This peeled back a layer of obscurity in the black box, something I gather most Home Assistant users find useful since the forums tend to share configuration code rather than steps in the GUI.
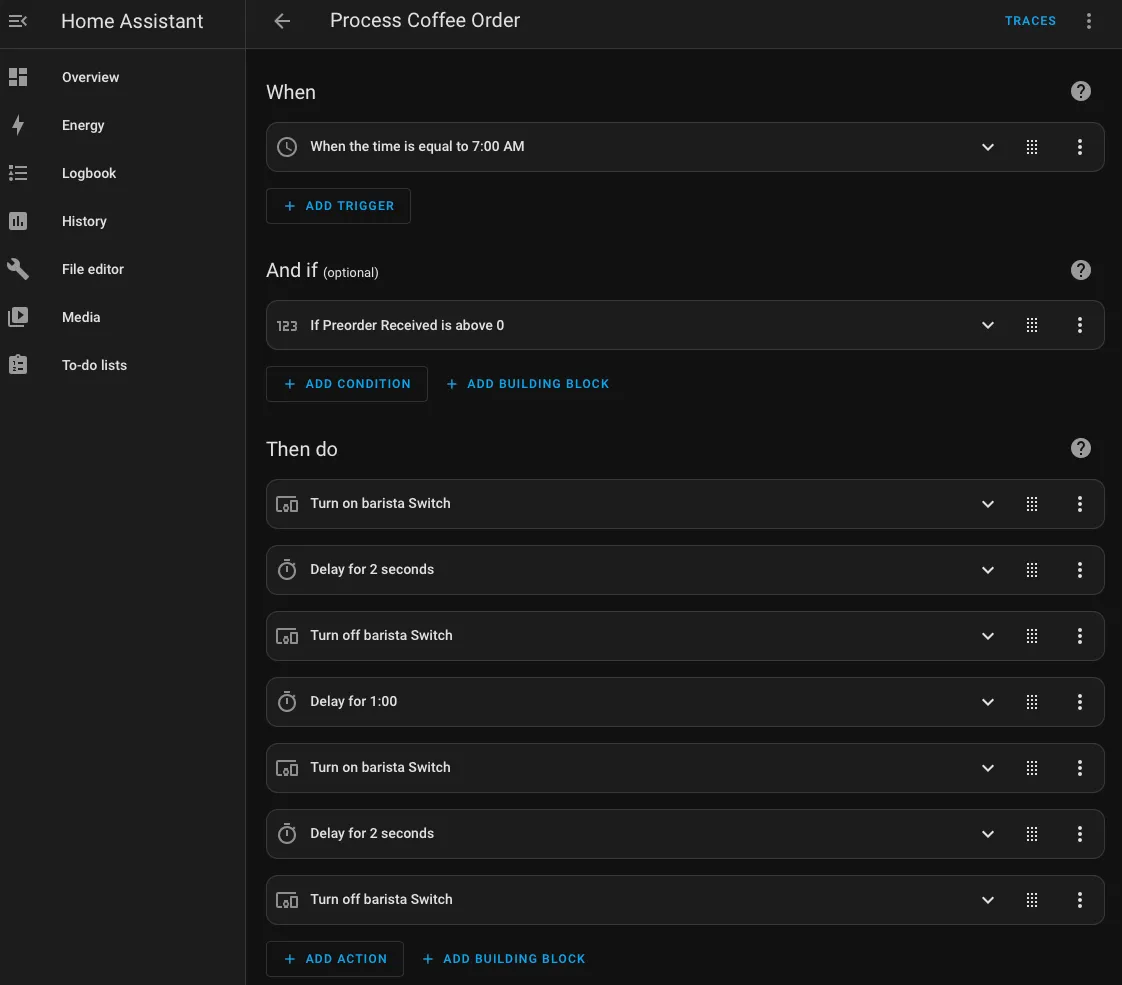 The orchestration relies on three tools within Home Assistant: Switch, Binary Sensor, and History Stats. Switch lets me toggle the switch by clicking a button or through an automation. Binary Sensor listens for input from a GPIO pin, which if you remember is how my button works. And History Stats keeps track of binary sensor inputs over a time frame. Together these tools let me write an automation that briefly turns on and off the switch (emulating the button press) if the History Stat showed more than 1 button press between 8pm the previous night and 5am that day. As I described in the Switch section, the first button press warms up the machine and the second give you coffee. The minute delay works fine and I haven’t tested any delay less than a minute yet.
Final Result
It ain’t pretty but it works.
What’s next?
Wallace and Gromit taught me the importance of comprehensive testing. I’ve been doing lots of testing tonight and am a bit wired. I’ll continue to test this in the weeks ahead and return here to give updates.
Clean up the look, possibly a case.
Add back a button for availability. The least reliable part of this system is me the user :). Sometimes, and I’m not sure why, but is has something to do with how I seat the pod, the machine decides not to make any coffee. If that happens I’d rather not have to open Home Assistant or even ask Alexa for my morning coffee. Instead I should add a button into the circuit so I can once again just make myself a cup of coffee with a button.
Remove the hardcoded 7am run time. Make the timing dependent on a field in Home Assistant that has a default of 7am. If I added smart blinds in the future then all my alarm functionality could rely on this value and I could adjust the value according to the days of the week or override it with an Alexa command.
More automation projects. As I said in my rant about electricity above, I think analog tools are a really compelling lever for designing time well spent.
Footnotes
1. If Vengeance Most Fowl taught me anything, it was that Wallace is a well adjusted bachelor with a fantastic morning routine. Please enjoy these instructional automation videos from Wallace.
2. Former World Barista Champion, Coffee YouTuber, and a personal hero of mine going on about a month now, James Hoffman, has an awesome video about how the Nespresso actually works.
3. Home Assistant, which runs on my Raspberry Pi, has an ESPHome plugin that allows you to flash your updated configurations to your ESP32. Compiling the initial configuration kept failing because it ate through the 1 GB of RAM on my Pi 3. There were lots of forum discussions on this issue and even a website from ESPHome that does the compiling for you but the only thing that worked for me was installing ESPHome with brew and compiling from my Mac. After that, recompiling happens much quicker and works over WiFi.
4. What do hardware projects like this have to do with time well spent? Time well spent is about designing our environment to make good things easier and hard things harder. That could be setting time limits on social media or making waking up easier and more enjoyable. I'm starting to see the ability to manipulate our physical environment using hardware as critical to designing environments where we can flourish.
5. This flashlight image and link are from a portfolio and blog I came across by Maya Pruitt. I really admired how her projects crossed disciplines of art, social science, and computing. If there was a conference where people like Maya came together to talk about their work I'd love to attend.
6. Speaking of electrical switches. Electrical switches called MOSFETs are the foundational components of logic gates which in turn are a foundational component of computing.
7. Super helpful how to for the button wiring.
8. Home Assistant is meant to operate and I would guess has protections to only accept local network traffic so they haven't gone through the work of setting up https. My usual browser, Zen, kept autocorrecting to https so I had to use Safari to connect to the Home Assistant URL. http://homeassistant.local:8123/. I think any FireFox browser has this problem without some configuration changes I found less easy than changing browsers.